Phylogenetic trees can be created from any selected partition, and
from any set of selected sequences (where the number of sequences is
greater than three).
When a tree is to be created, it is formed using the tree generation settings specified in the Analysis Settings dialog (see analysis settings for further information).
To create a tree, first select the sequences that are are to be used for the new tree (see selecting sequences for further information on how to do this). If the tree is to be formed from all sequences, this step is unnecessary.
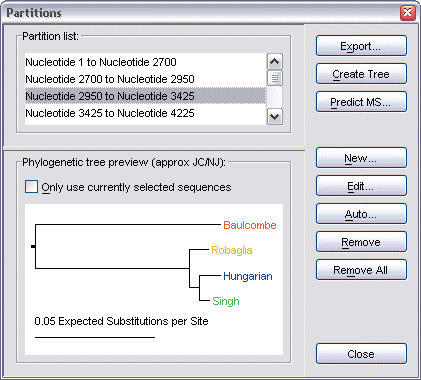
Next, you must decide what partition of the alignment should be used. For a new alignment, the selected partition will be the whole alignment, but you can override this by using the Partitions dialog to create additional sub-partitions. Select Alignment | Show Partitions Dialog from the menu bar, or press F7 on the keyboard to bring up this dialog.
The help page on partitions provides further information on working with this dialog.
Once the sequences and partition have been chosen, select Analysis | Create Phylogenetic Tree from the menu bar, click the Create Phylogenetic Tree toolbar button, or press Ctrl-T.
| |
Create Phylogenetic Tree |
Alternatively, if the
Partitions dialog is visible, you can click its
Create Tree button to create a tree from the currently selected
partition in its list. This brings up the Create Phylogenetic Tree dialog.
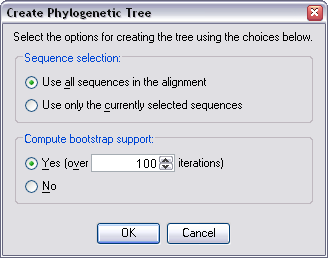
From here, you can select whether to create the tree using all the
sequences in the alignment, or just the currently selected sequences.
You can also choose to compute bootstrap values for the tree, selecting
from 10 to 10,000 iterations to perform the computation over.
Choose OK once you are happy with your selections.
The tree will now be created (note that this may take some time depending on the tree generation settings you have selected, the number of sequences selected, the length of the partition, and whether bootstrapping was selected or not).
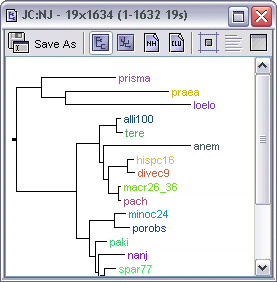
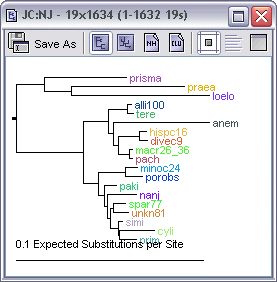
Once the tree is ready it will be displayed within its own internal frame, located within the main window's Trees pane. Each new tree that is created will be displayed here too - there is no limit on the number of open trees that you can work with.
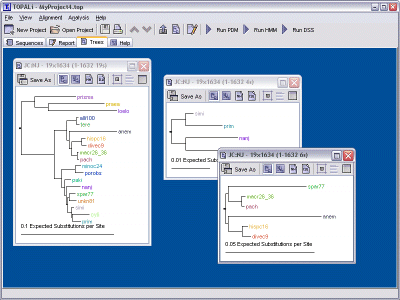
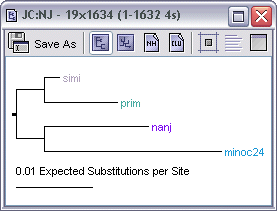
Each tree's internal frame has four methods of viewing that tree. By default, the view shows a Phenogram representation of the tree, but this can be switched to one of the other views by clicking the appropriate toolbar button.
| |
Show Phenogram Tree - displays the tree using a standard, midpoint-routed pheonogram representation |
| |
Show Circular Tree - displays the tree in a circular form |
| |
Show New Hamshire Details - displays the New Hampshire structure of the tree (as text) |
| |
Show Cluster details - displays information relating to the current clustering settings for this tree |
When very large trees are being displayed, the internal frame for that tree will provide scrollbars to view those areas of the tree that cannot fit on the screen. However, by clicking the Fit Tree to Window Size toolbar button, the tree will be rescaled to fit the internal frame, regardless of the size of the tree itself.
| |
Fit Tree to Window Size |
Any tree can also be removed from the main window and displayed in its own floating dialog (which can be helpful if you wish to view the tree while using another part of TOPALi's interface). To accomplish this, simply click the Display Tree in Floating Dialog toolbar button.
| |
Display Tree in Floating Dialog |
To return a floating tree to the main window, either click the button again, or close the floating dialog's window.
To group (and colour) similar sequences on the tree into unique clusters, click the Group Clusters toolbar icon. You will then be asked to pick a threshold level for the clustering.
| |
Group Clusters |
Trees can be saved in one of two formats:
To save a tree, click its frame's Save Tree As toolbar button.
| |
Save Tree As |
The Save Tree As dialog will then appear, allowing you to choose a location on disk for the tree, along with the data format to save it in.