A partition is defined as any region of the current alignment, and contains both a starting nucleotide and an ending nucleotide.
TOPALi projects allow you to create and track multiple partitions to aid with analyzing the results obtained from PDM, HMM, or DSS runs. Partitions allow you to:
All defined partitions are saved as part of the project file being worked with.
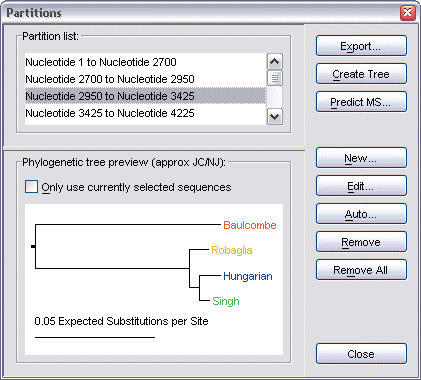
Working with partitions involves the use of the Partitions dialog, accessible by selecting Alignment | Show Partitions Dialog from the menu bar, or by pressing F7 on the keyboard.
This dialog lists all defined partitions for the current project, and also provides a Jukes Cantor/Neighbor Joining Phylogenetic tree preview of the currently selected partition.
The dialog also provides two short cuts - one for creating a full tree from the partition, which can be done by clicking the Create Tree button (see creating Phylogenetic trees for more information on this), and another for predicting the mosaic structure of the alignment (see predicting the mosaic structure for information on this).
To create a new partition from scratch, select the New button. This brings up the Edit Partition dialog which allows you to define a starting and ending nucleotide position for the new partition.

Once appropriate values have been enter, click OK, and the new partition will be added to the list, in addition to becoming the currently selected partition.
Partitions can also be automatically chosen, based on the threshold levels of existing analysis results sets. To do this, click the Auto button (or select Analysis | Auto-Partition Alignment from the menu bar). This brings up the Auto-Partition Alignment dialog.
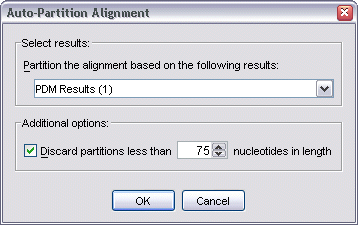
The dialog will list all of the current project's results sets (that contain significance threshold lines). The result set chosen will be the set used to partition the alignment.
As very small partitions may be meaningless, an option exists to discard partitions whose length is less than the chosen threshold.
Whenever a partition is selected, it will be highlighted on all current graphs, as well as within the Sequences display pane too.
As an example, the following shows the highlighting that occurs on a PDM results graph when a partition from 6000-8000 has been selected.
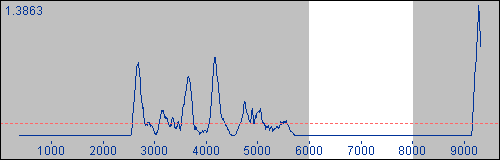
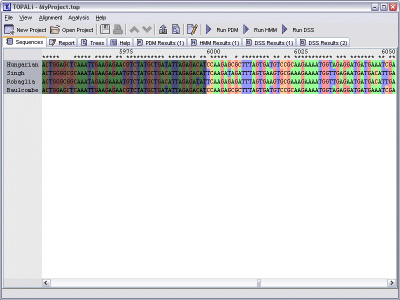
Similarly, the Sequences pane updates to reflect the same information by darkening those nucleotides that do not lie within the current partition's region.
In addition to creating partitions manually, it is also possible to create a new partition by selecting it directly from a results graph.
To define a new partition click and hold the left-mouse button over the graph, then drag left or right with the mouse until the partition highlighting covers the desired region. Release the mouse to confirm the new partition.
Note that partitions created in this way are not automatically added to the Partitions dialog. To do this, select Alignment | Add Selected Partition from the menu bar, or click the Add Currently Selected Partition to Partitions Dialog toolbar button.
|
|
Add Currently Selected Partition to Partitions Dialog |
Once the partition has been added to the Partitions dialog's list, it can be refined further by selecting it, then clicking the Edit button.
To export a partition to disk (in any of the supported TOPALi alignment file formats), first select it from the list, then click the Export button.
You will then be asked whether to save this partition using all sequences in the current alignment, or just with the currently selected set. Once the choice has been made, the Export Partition dialog will appear allowing you to choose a destination file to save the partition to, as well as picking the format to save it in.
To remove a partition from the list, first select it, then click the Remove button.
To remove all partitions from the list, click the Remove All button.